July 2, 2015

Vermiculture Tips


Here are some vermiculture tips that I practice at home.

Vermi Tip #1: Use rice wash to water the bedding.

Maintaining 70% - 90% moisture in your earthworm bedding is necessary for the survival of African Nightcrawlers. Using rice wash to water the bedding helps maintain the required moisture content. Rice wash also contains plenty of microorganisms that help in decomposing materials in the bedding.

So, next time you cook rice, use the rice wash to water your earthworm bed.

Vermi Tip #2 : Adult African Nightcrawlers (ANC) weigh on the average 1 gram per worm. Thus, a kilo consists of about one thousand (1,000)earthworms.


Vermi Tip #3:  Using Orchid Clay Pots to Catch Earthworms

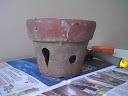
To capture meandering African Nightcrawlers in your garden, use orchid clay pots as a container for worm food. Orchid clay pots have several large holes that give easy access to worms.
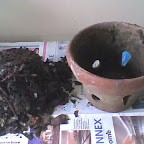
Place the pot with worm food in a location that shows recent worm activity. Moist granular soil is a good indicator of worm activity. Make sure that the bottom of the pot makes contact with the soil. Wait 3 to 5 days. Empty the pot and sort out the worms. After sorting out the worms, return the pot with worm food at the same spot if you feel that there are still some worms left. If not, place the pot in another location.


Vermi Tip #4:  Minimizing the Effects of High Temperature to Earthworms

The Philippines has been experiencing record temperature highs due to the El NiƱo weather phenomenon. The average maximum temperature for the past week reached more than 38 degrees Centigrade! [I am still trying to get the actual weekly average, but it was scorching hot!]. This temperature level is deadly to earthworms and requires mitigating actions.

Here are a few things that earthworm pet owners can do.

Outdoor Bins

1. Place your earthworm bin in a fully shaded area where sunlight can't reach the bin.

2. If this is not possible, surround your bin with plants in clay pots.
The plants serve as sunscreen. Additionally, the clay pots absorb heat during the day and slowly release the heat at night time.

3. Water frequently but reduce the volume.
Before, I used about 500ml of water for each sack, watering 3x a week. Now, I use about 350ml, watering every other day.

4. Add ice to keep the bedding cool and to maintain moisture.
I add 5 to 6 cubes of ice per sack on days I don't water, putting the ice cubes on top of the bedding, under the newspaper cover.

5. Add newspaper mulch to cover your bin to lessen evaporation rate.
I use several sheets of newspaper dipped in water. Every time I water my sack bins, I first collect the newspaper cover, water the bins, then return the newspaper cover that has been dipped in water.

Indoor Bins

1. Find and place the bin in the coolest location.
In our house, the coolest place is under the kitchen sink since our kitchen walls never get any direct sunlight.

If you have one, the basement might be the best place to put your earthworm bin.

2. Use ice cubes to keep the bedding temperature down BUT keep the ice cubes in a ziplock plastic bag.
Unless your bin is right beside a drain pipe, it is better to just contain the water in a bag once the ice melts. This way, you don't have to deal with a soggy bedding.

These are just some ways to minimize the effects of high temperature to earthworms.

If you have other ideas, why not share it by writing on the comments section?

Vermi Tip #5:  Add eggshells to neutralize an acidic worm bed

Adding crushed eggshells neutralizes an acidic worm bed. Eggshells can be collected from bakeshops and local restaurants serving tapsilog.

In my case, I provide a couple of small, black plastic garbage bags to the establishment. It makes it easier for them to segregate the eggshells from the rest of the food waste.

Usually, the baker or owner determines the collection date when eggshells are available. I return to the establishment on the day set since eggshells produce a strong odor if not collected promptly.

The eggshells do not undergo pre-composting anymore. I just add the crushed eggshells direct to the worm bins.

May 25, 2015

Earthworm Buyer's Profile

I am profiling my clients based on WHY they bought African Nightcrawler (ANC) earthworms because I have reached a milestone, my 100th customer. 

I classified customers into four profiles based on their reasons for buying worms.
  1. Those wishing to start their home vermicomposting projects and edible gardens.  Eighty three (83) of my customers (out of 100, making it 83%) want to reduce their carbon footprint by recycling their kitchen wastes into organic fertilizer.  Also, they want to grow their own food in recycled containers.    
  2. Those who have a school Biology project.  Eight (8) out of 100 (or 8% of total) comprise of mothers of high school students.  This is usually a desperate lot I get to deal with due to time constraints. I have turned down a lot of orders because they want their orders served on the same day or delivered the next day to the school of their kids.  I patiently explain to frustrated mothers that I only get to serve orders on weekends because I have work and worming is just a hobby.  I can only imagine the predicament of their children after the end of the call.
  3. Those who are starting a farm.  There were seven (7) guys who wanted to buy in bulk which I discouraged at the beginning.  I told them to first get used to culturing worms before buying in bulk.  This group was also the most inquisitive when it comes to asking information.  Of course, I answered all their questions and I sent a follow-up email for links to sites I have read on organic farming and beneficial microorganisms.
  4. Those who want fishing bait.  I had two guys purchasing worms as fish bait.  These guys were very specific with the sizes of the earthworms they want.  In fact, they prefer the local earthworms to African Nightcrawlers since the locals worms are much bigger.  I had to eventually turn them down after several repeat orders because my earthworm population drastically declined.  I had to re-seed my worm bed to regain biomass for efficient vermicomposting.
It has been a learning experience for me and hopefully, for my customers as well.  Fortunately, there are only a few clients coming back to purchase again due to their earthworms dying out. 

To all my customers and readers of this blog, thank you!  May your tribe increase!

February 5, 2015

How to Culture Lactobacilli (LAB) Beneficial Microorganims for Your Garden

Source: iz quotes
My mother has the habit of taking in stray cats in our neighborhood.  This resulted in more than ten cats taking residence in our home.  It was unmanageable and eventually, bad odors developed in our backyard due to cat droppings.  This pushed me to research on the best way to eliminate bad odors without leaving chemical residues in the soil.

My research introduced me to effective microorganisms, natural farming practices, wicking gardens and a lot of other good things.

In 2009, I started culturing Lactobacilli (LAB) to get rid of the bad odors at home.  After  several months of experimentation, I decided to launch Biolant beneficial microorganisms as a product. Although the business didn't take off as well as I expected, I was quite successful in eliminating bad odors!  

I have decided to share the formula/recipe I used in culturing Lactobacilli.

Here are some reminders:


  • I followed CLEAN kitchen concepts in preparing and handling the ingredients and equipment.  
  • For measurement, 1 liter = 1 kilo

The steps in culturing Lactobacilli can be divided into two major parts:


  1. Collecting the inoculant.  
  2. Multiplying and storing the Lactobacilli.


PART 1: COLLECTING LACTOBACILLI USING RICE WASH

Ingredients:

Rice        1 part
Water      2 parts

Materials:

Container for fermenting rice wash

Directions:


  1. In a container, mix one part of rice and two parts water.  Thoroughly and vigorously wash the rice.  This makes the water cloudy.  
  2. Transfer the cloudy water into another container with 50% to 75% head space to allow air circulation. Cover mouth of the container with cheesecloth wrapped with rubber band (or anything that will hold the cloth).  Manila paper can be used to cover the container.
  3. Place the rice wash in a cool dark spot for 5-8 days. The mixture should smell mildly sour in a few days.  [At first, I left the rice wash for one week.  The smell was not mildly sour anymore but I still used it as inoculant.  It was hot and humid at that time.  It must be due to the ambient temperature.  It only takes about 3 days here in the Philippines for the rice wash to turn mildly sour.]
  4. By this time, layers have formed.  Strain out the solids and you have your inoculant.


PART 2:  MULTIPLYING LACTOBACILLI USING A NUTRIENT SOLUTION

Ingredients:

Water - 10x the volume of inoculant.  Use non chlorinated water.


  • If direct from the tap, I let the water sit for 24 hours before use.

Black Strap Molasses / Brown Sugar - 3% of weight of total liquid (water + inoculant).  ASSUME: 1 liter = 1 kilo.


  • I use Dark Brown Sugar which is more acceptable to organic advocates.  I can't find a molasses supplier in Marikina City.  I also experimented with white sugar and it worked just fine.  

Milk (Special) - 12% of weight of total liquid (water + inoculant).


  • I use Special powdered milk sold in a bakeshop supply store.  Best to inform store personnel that the milk will be used for fermentation.  The store owner recommends a more expensive powdered milk but in my case, the SPECIAL (Sp.) type was sufficient. The cheaper types had a lot of milk extenders which ruined the fermentation process.  
  • Using and buying powdered milk from a bakeshop supply store is the cheapest way to make your nutrient solution as regular milk from the grocery is quite expensive.
  • Branded powdered milk from the grocery contains sugar but it also works well, except for the cost. 
  • You can use regular milk (liquid) or branded powdered milk from the grocery but it is very expensive.  
  • The name of the store is St. Ellen's Supplies and Gen. Merchandise, "Bayan" Marikina.  This is along Shoe Avenue in Marikina City, right across Marikina Sports Center and Red Ribbon. 

Inoculant - fermented rice wash (For those who skipped it, please read Part 1)


          Here's an example computation:


          Let's assume that we have 360 mL of fermented rice wash (inoculant).  

          The weight of the ingredients are computed as follows: 

               Water - 3600mL or 3.6Liters (10x volume of inoculant)                   
                    1.  360mL x 10 = 3600mL or 3.6Liters


               Sugar - 120 grams or 3% of total liquid.  
                    1.  Get total volume of liquid.  3600mL + 360mL = 3960mL.  
                    2.  Multiply 3% to the total.  3% x 3960mL = 118.8 grams => 120 grams


               Powdered Milk (Special) - 475 grams (12% of total liquid)
                    1.  Get total volume of liquid.  3600mL + 360mL = 3960mL.  
                    2.  Multiply 12% to the total.  12% x 3960mL = 475.2 grams => 475 grams      

Directions:
  1. Make your nutrient solution by dissolving the milk, sugar and water in a plastic container with a 50% to 75% head space for air circulation.  I used a 20 liter plastic bin for this mixture.  TIP:  I heated the water to about 34°C to easily dissolve the sugar and milk.  Use a wooden / plastic spatula to stir the mixture.  
  2. Add the inoculant and mix well.
  3. Cover the bin with several layers of cheesecloth.  
  4. Let the solution ferment in a cool, dark spot for 12 to 14 days.  By the 12th day, the aroma has become really strong and ready for straining.  
  5. Strain out the solids.  The yellowish liquid is your Lactobacilli (LAB).  
  6. Add an equivalent amount of molasses/brown sugar to the LAB to allow long-term storage. [Six months, in my case.]
  7. For storage, you can use plastic bottles similar to bottled water but you have to release gases formed to prevent a sticky explosion.  I used plastic bottles that wasn't air tight.  This allowed gases to escape but the shelf life was reduced to 6 months.  
I don't have pictures that come with this post but I found another site with plenty of pictures that also discusses how to culture Lactobacilli.  The pictures help in understanding and their container for storage solves the problem of gas formation. Click the link to go to the site, Confessions From The Soil.

The procedure I have shared is the product of research, experimentation and usage.  I don't have scientific proof that it works.  

The only proof that I can claim to is that the bad odors  at home, after several years of enduring it, is gone.


July 23, 2011

Wick Technology Raises Gardening To A Higher Level

The application of wick technology raises gardening to a higher, almost revolutionary level. Man has used wick technology since making  the first candle. Wick technology applied to gardening called wick garden is a timely innovation.

The wick garden is simple, scientific and scalable.

A wick is a simple device. It is a piece of material that conveys liquid by capillary action {source: http://www.thefreedictionary.com}. Capillary action (or capillarity) is defined as the ability of liquid to flow AGAINST GRAVITY where liquid rises in a narrow space such as a thin tube, or in porous materials such as paper. {source: http://en.wikipedia.org}

This property of liquid, called capillarity, is the scientific basis of the wick technology. A tree survives due to capillary action of water through its trunk. In the same manner, a wick garden works due to water's capillary action.

Wick technology is scalable. It applies to plant containers up to orchards and agricultural fields. It follows that small scale technology application requires minimal investment while large scale, agri-industrial application demands large capital expenditure.

Wick technology is also adaptive to climate change for the following reasons.

First, it considerably reduces water consumption. A wick garden saves water in two ways.
#1 Wick technology lessens water loss due to evaporation.
#2 The technology captures rainwater through its reservoir.

Second, wick technology involves the creative use of recyclable and reusable household waste products. Materials can be sourced from junk shops. Composted biodegradable waste helps the technology to work properly.

It can be said that adoption of wick gardens can influence positively our community and environment.

July 21, 2011

Our Community Benefits from Urban Vegetable Gardening

Communities can benefit from urban vegetable gardening in several ways:
  • First, vegetable gardening lessens food purchases, the grower just harvests ripe vegetables for family consumption.
  • Second, consumption of garden produce increases nutritional intake since vegetables contain macro- and micro-nutrients essential to health.
  • Third, vegetable gardening creates livelihood opportunities through sales of excess produce, seedlings and other gardening-related products like organic fertilizers, seminars, etc.
  • Fourth, vegetable gardening on idle lots lessens maintenance costs and fire risks associated with tall grasses (talahib) during the dry season. Gardening requires constant weeding as unwanted plants and weeds pose competition for limited space and plant nutrients. 
  • Fifth, vegetable gardening closes the food production and consumption cycle {food production -> consumption --> waste --> composting --> food production} through the use of compost as a gardening input.  Livelihood also come from the collection and sales of recyclable and reusable materials as a consequence of segregating organic household waste for composting.
Why not start a community vegetable garden on an idle lot?